This C4 Corvette Gets a Suspension Upgrade
Suspension Evolution
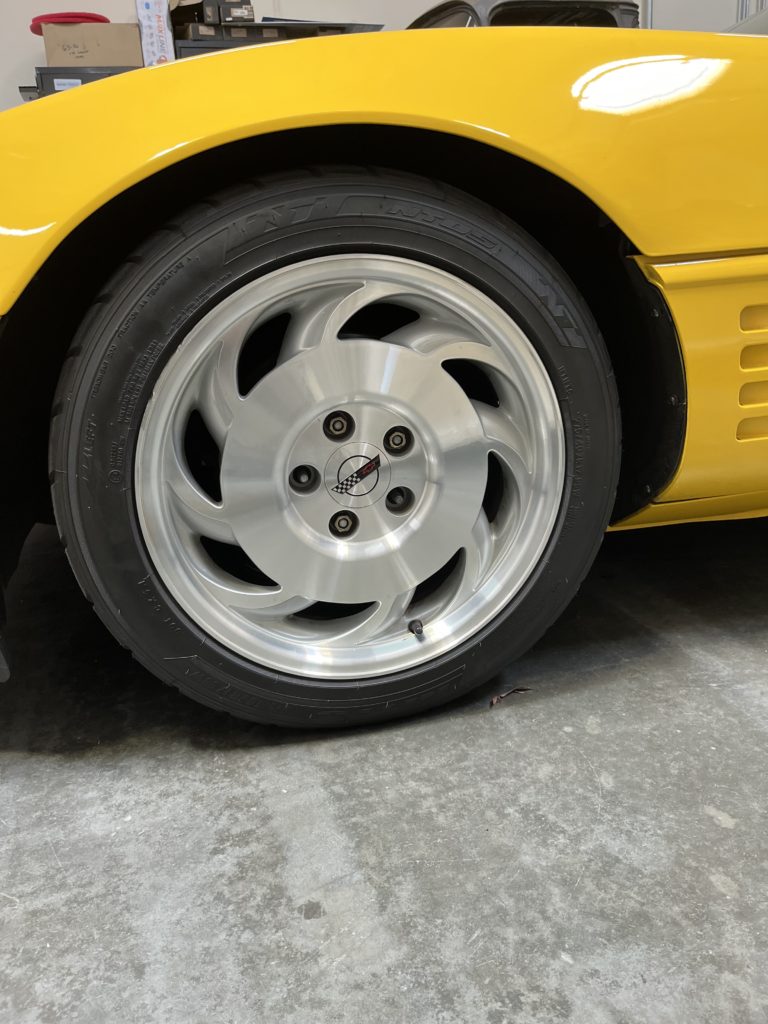
Installing Aldan American coil over suspension on 1988-96 Corvettes
By Cam Benty
The C4 Corvette was state of the art for its time. With fiberglass transverse leaf springs and aluminum A-arms front and back, it was a technological leap forward for the Corvette platform. Today, these cars offer a great bang for the buck with supreme affordability and solid performance.

Aldan American’s engineering team knows just how exhilarating these cars are to drive and decided that this Corvette platform deserved a redo, introducing Aldan American’s high tech coil over shock system specifically for the ’88 – ’96 Corvettes. Best of all, the Aldan American Road Comp kit requires no special tools to install and no cutting or fabrication of the factory suspension which results in greatly improved handling for these aging performance vehicles.
The original C4 Corvette was introduced in 1984 and ceased production in 1996 before launching the C5 Corvettes beginning in 1997. The Aldan American coil over kit fits C4 platform vehicles from 1988 through the 1996 model (they do not fit the ZR1 Corvettes that begin production in 1991 or any electronics active suspension equipped cars).
Like all Aldan American kits, the suspension can be adjusted to maintain the factory ride height; however, most performance fans looking to reduce the roll center of the vehicle for better cornering capability will look to lower the car up to its maximum of two inches. It should be noted that when lowering your vehicle, make sure that your tires do not contact the bodywork at any point including while braking, accelerating, or cornering.
Who is Aldan American?
Established in 1981, Aldan American is the professional’s choice for high quality, performance shock absorbers, coil-overs & suspension products designed for street performance, racing and vehicle specific applications. Aldan products are designed, tested and manufactured in Los Angeles, California. From the first-time builder to the professional racer – Aldan American is ready to help you achieve your suspension goals.
Today’s Install:
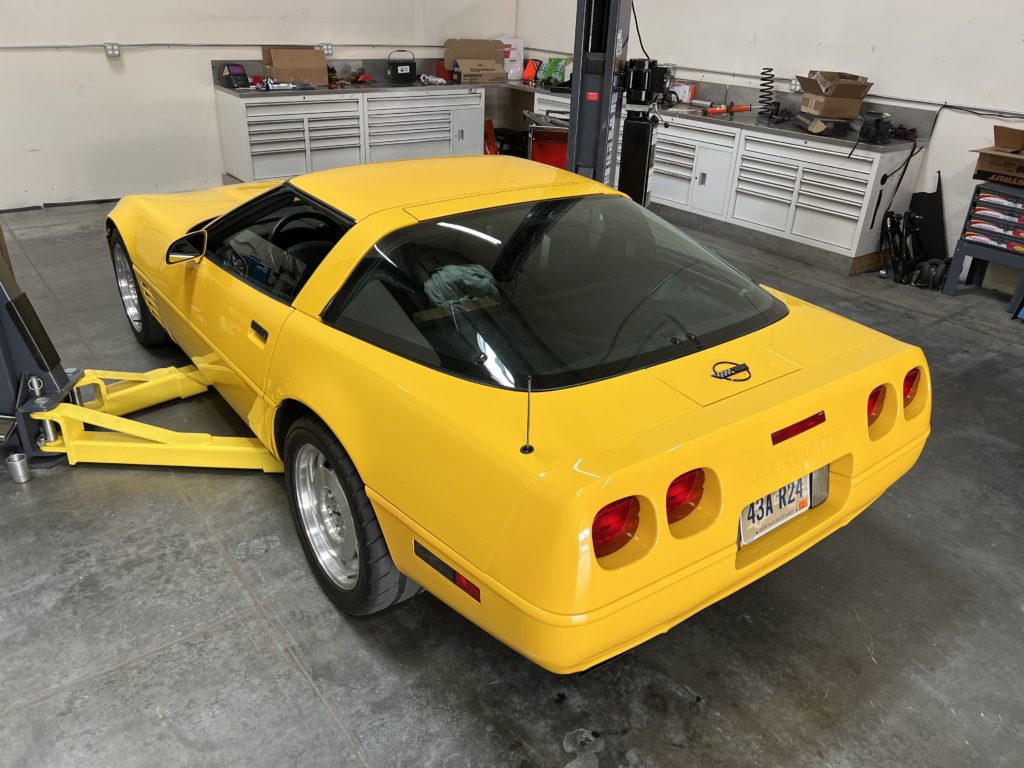
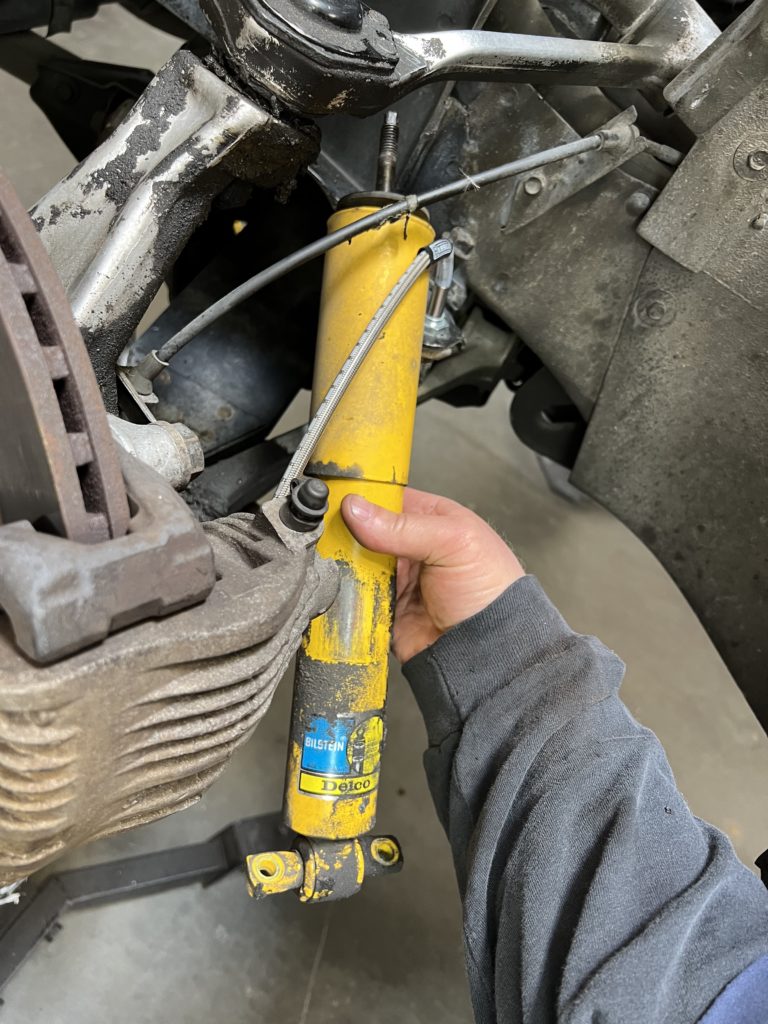
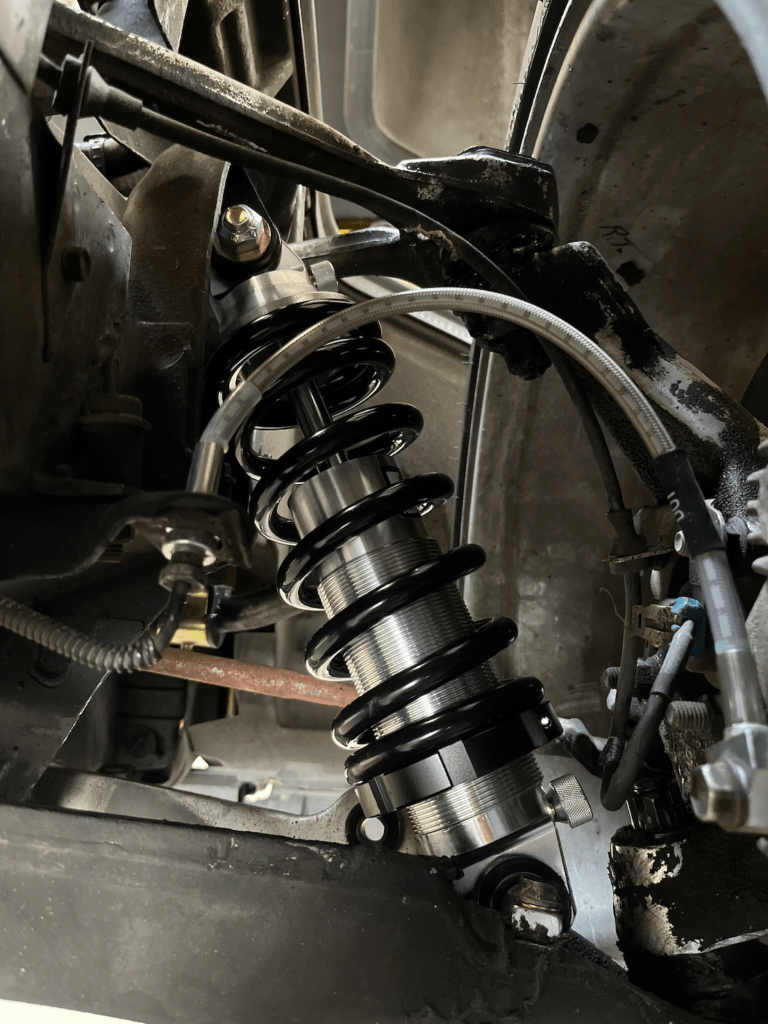
To demonstrate the Aldan American C4 Corvette kit, we used a 1993 model Corvette equipped with standard suspension and a manual transmission. The Aldan American kit works with any transmission offered from 1988-1996. The Corvette was in excellent condition and all suspension parts appeared to be original with the exception of the aftermarket Bilstein shocks. It should be noted that the original transverse fiberglass leaf springs are removed – front and rear – during this upgrade. The Aldan American coil over shocks features specially tuned springs that wrap around the adjustable center shock. It should also be noted that Aldan American offers a number of finishes, our choice for today’s install are the polished coilovers.

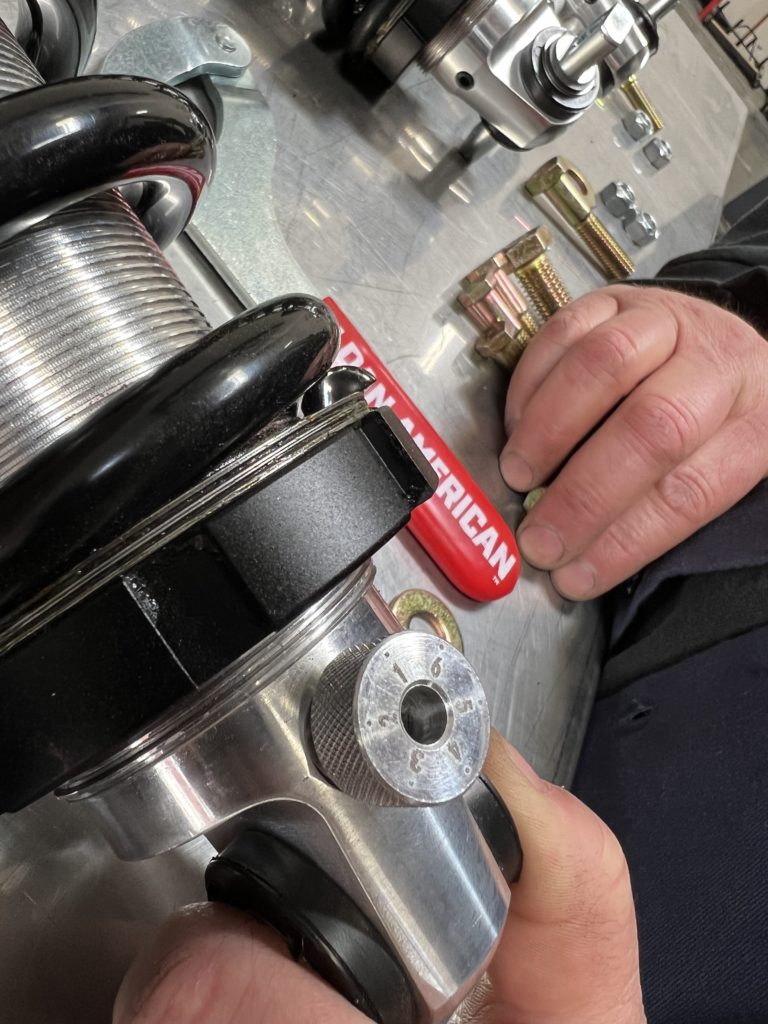
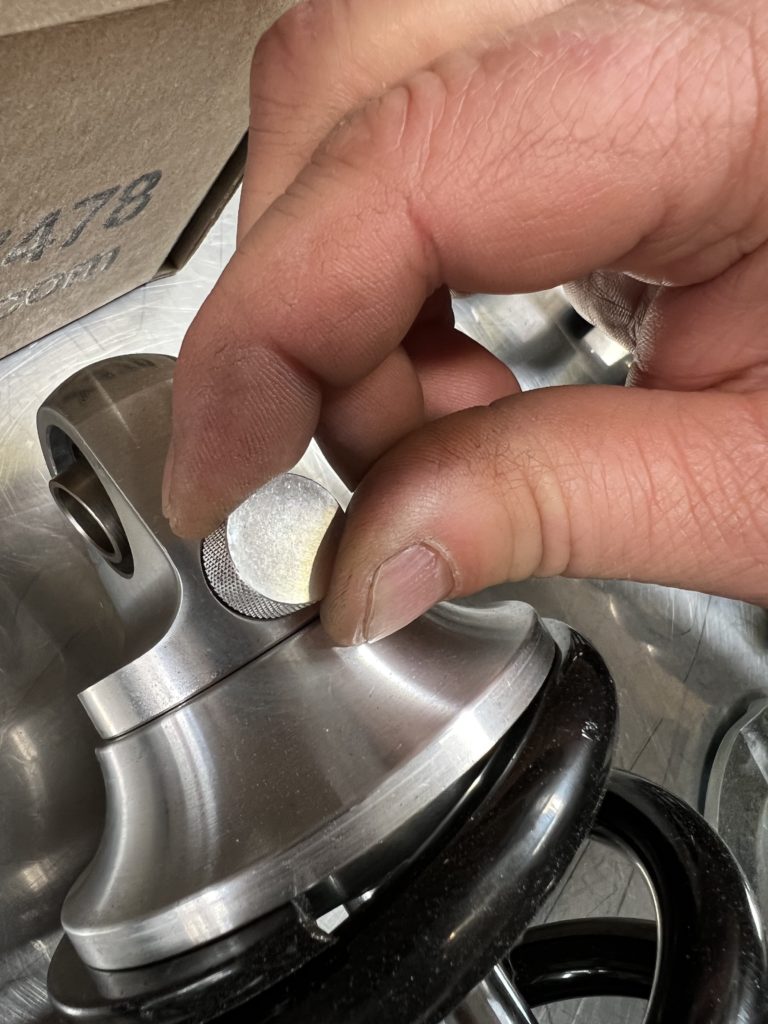
Aldan American shock systems come in two forms – single or double adjustable – dependent on the requirements of the car owner. Changing the compression (single adjustable) or rebound (double adjustable) configuration simply requires a turn of the knobs located at either end of the shock. For this system, there are 11 positions of adjustment for rebound (top knob) and six for compression. Turning either knob will reduce or increase rebound or compression respectively.
Ride height adjustment can be changed by using the Aldan-supplied wrench which rotates the spring collar either up or down on the threaded shock body. A set-screw locks the collar in position and keeps your ride height setting in place. This system allows for setting ride height with extreme accuracy.
Follow along as we install a set of very cool, very high tech Aldan American coil overs on this classic yellow C4 Corvette – refined suspension personalization in-the-extreme for performance fans.
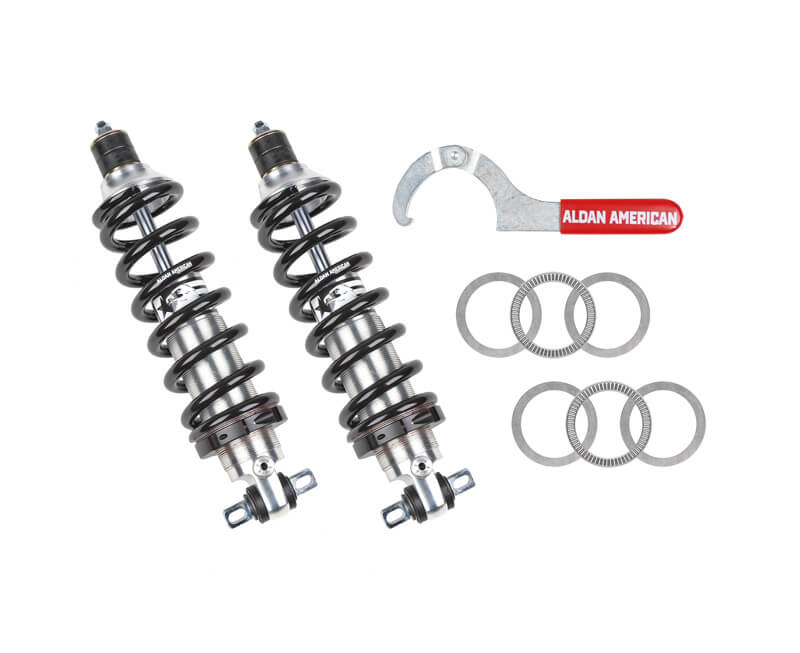
Aldan Corvette kit for 1988-96 models:
PN# 300224 (Front) shown above (Single Adjustable) & PN#300225 (Rear) shown below (Single Adjustable)
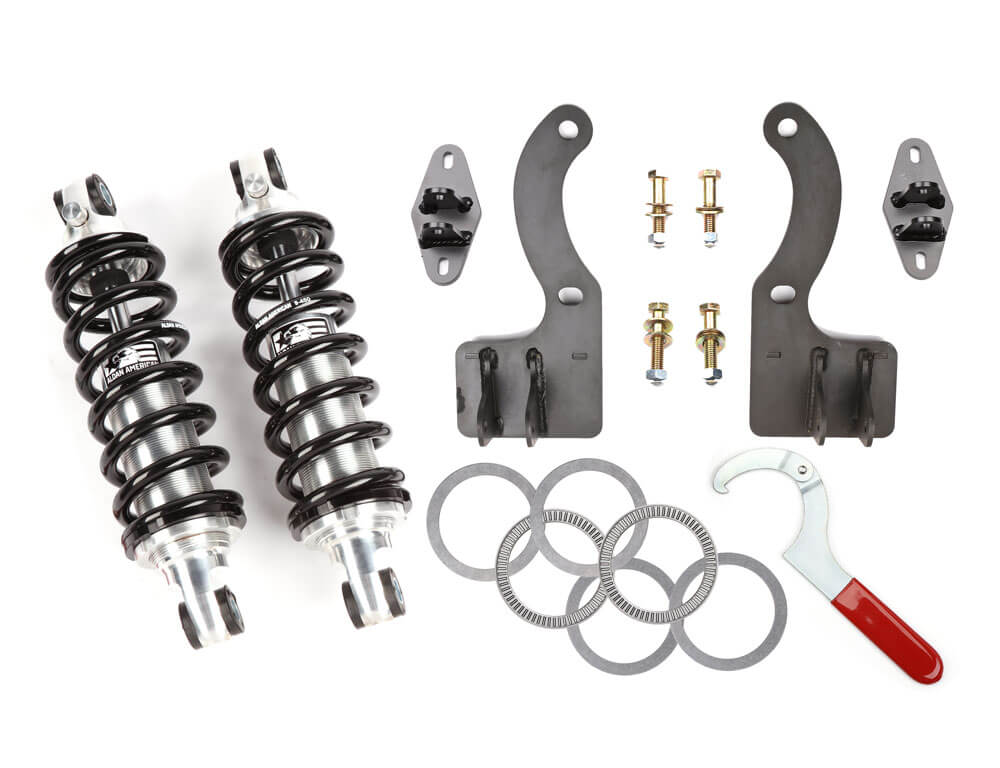
Includes, four coil overs, adjustment tools, all hardware and detailed instructions.
1) Our test vehicle was a 1993 Corvette equipped with a six-speed manual transmission. Aldan American’s Road Comp kit fits any year C4 from 1988-1996 regardless of transmission, but does not work with ZR1 or active suspension-optioned vehicles.
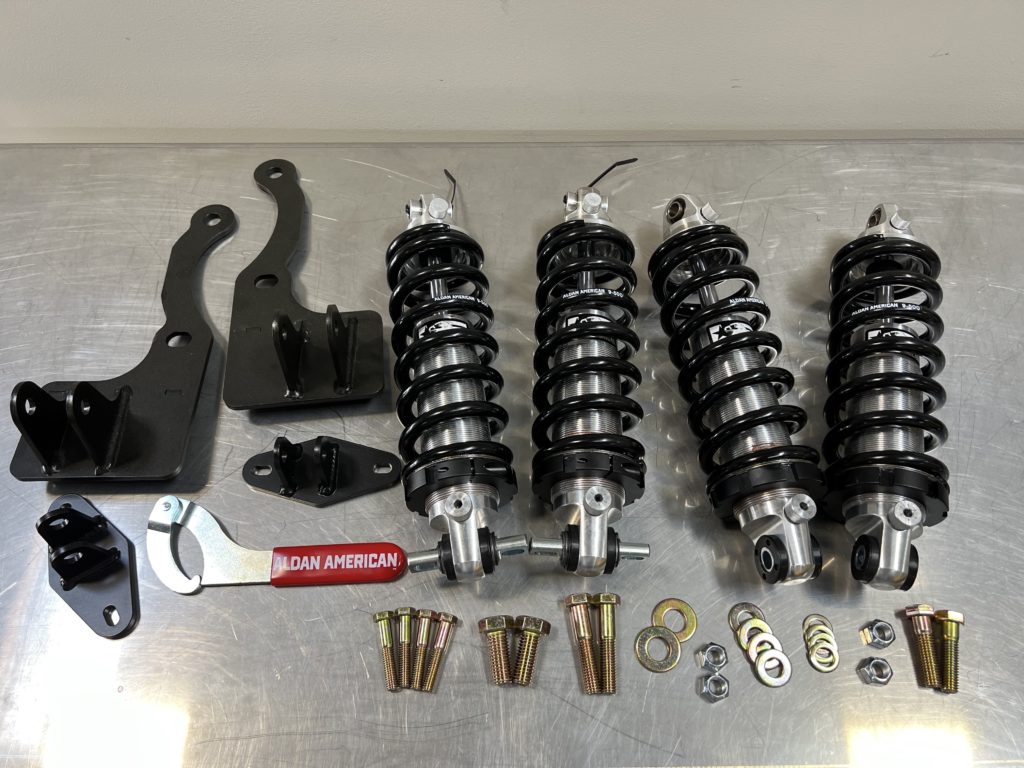
2) Aldan American’s C4 Corvette kit includes a set of four ready-to-install coil over shocks, two brackets for the rear end, ride height adjustment wrench, all hardware and easy-to-follow instructions.
3) Step one with any Aldan American coil over upgrade is to determine the current ride height of the vehicle. With the Corvette parked on a flat surface we measured the height of the fender lip from the ground.
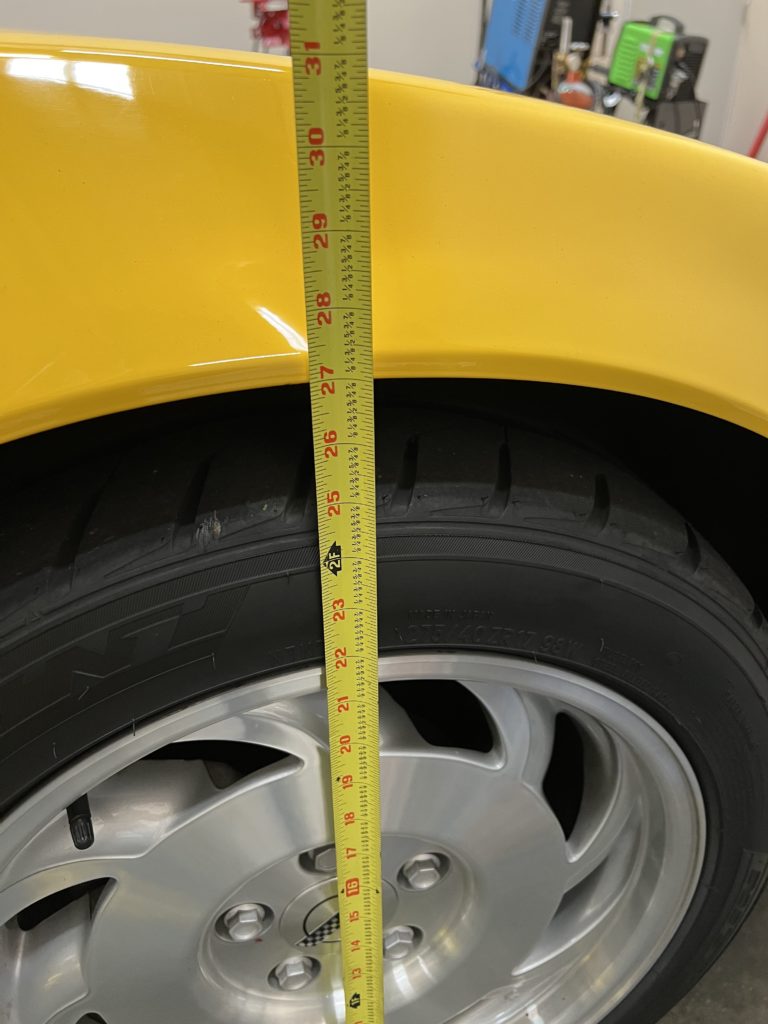
4) This diagram shows the results of our measuring session. The front end was shocking even at a height of 27-inches left and right. In the rear the results were similar at 27 1/4 inches tall on the left side and 27 1/2 on the passenger side.
With our Aldan American coil over kit, we could leave the ride height at this level while balancing out the car perfectly side to side in the rear, or drop the overall height of the vehicle as much at two inches, if desired, as long as we don’t encounter any tire or chassis clearance issues.

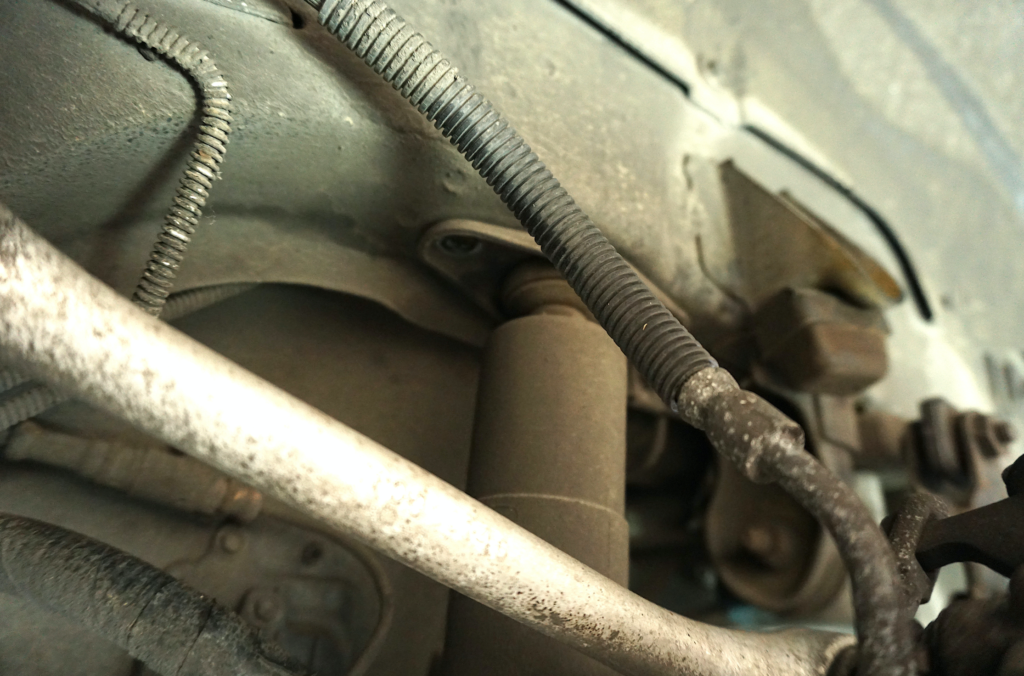
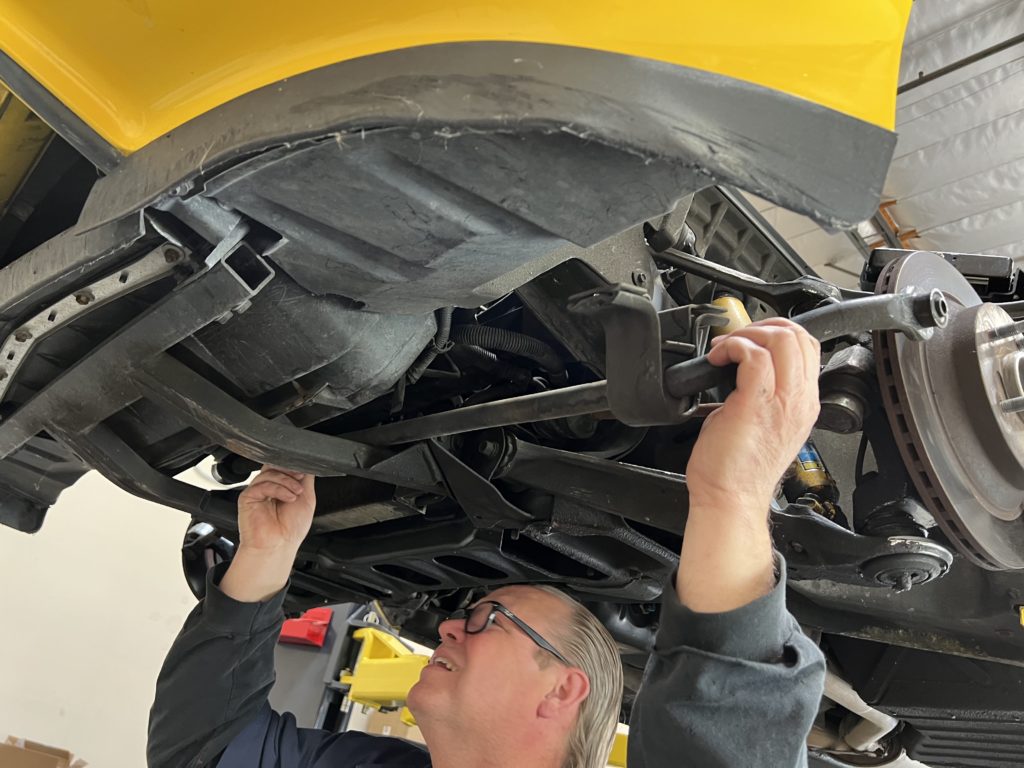
5) With the tires removed and the Corvette safely supported on our lift (there are jacking points noted on the Corvette chassis by the factory), we removed the tires and inspected the suspension for damage and overall condition. In our case the only obvious problem was a leaky rack & pinion steering where torn rubber boots had allowed the steering fluid to escape. Always inspect the suspension for problems and give the chassis a cleaning to make it easier to work on.
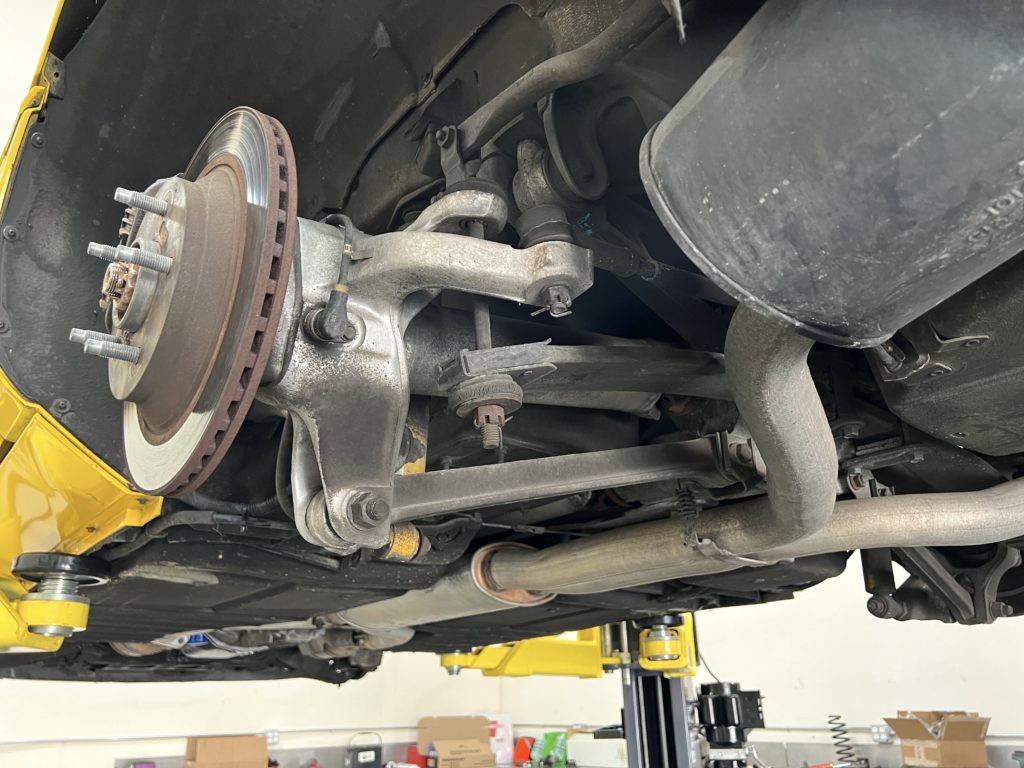
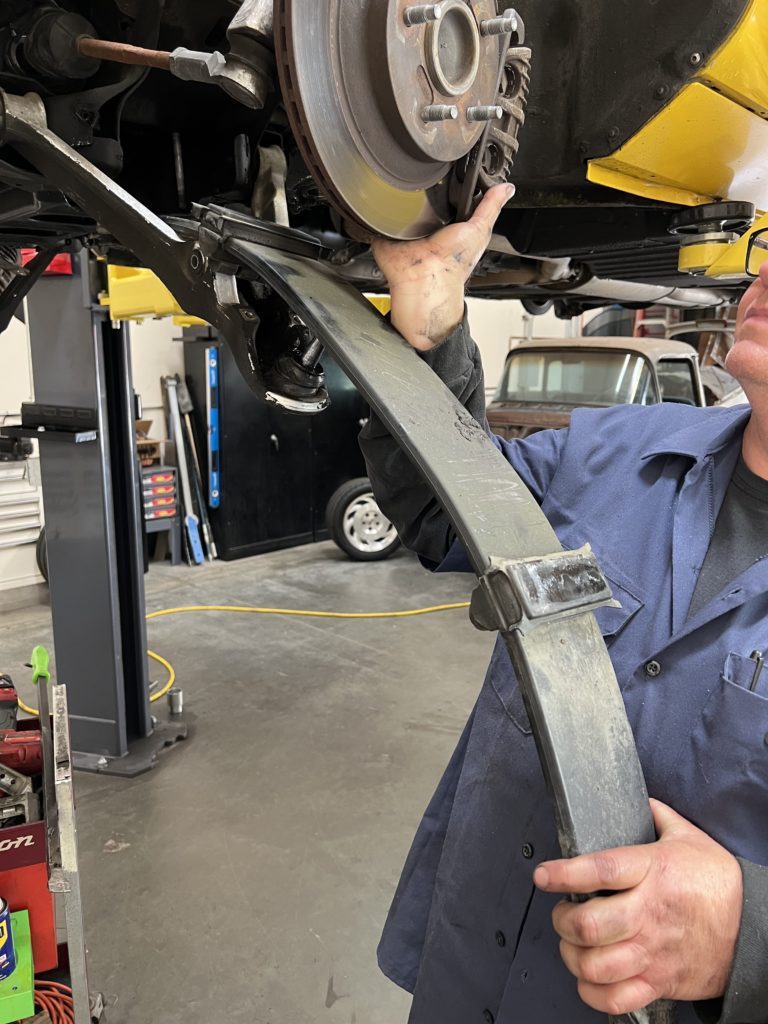
6) The C4 Corvette platform uses transverse fiberglass leaf springs (arrow), front and rear, to support the suspension. For our purposes, both the front and rear leaf springs will have to be removed. Do not leave them in place or the ride quality will be terrible – a common problem for installers who don’t read the instructions.
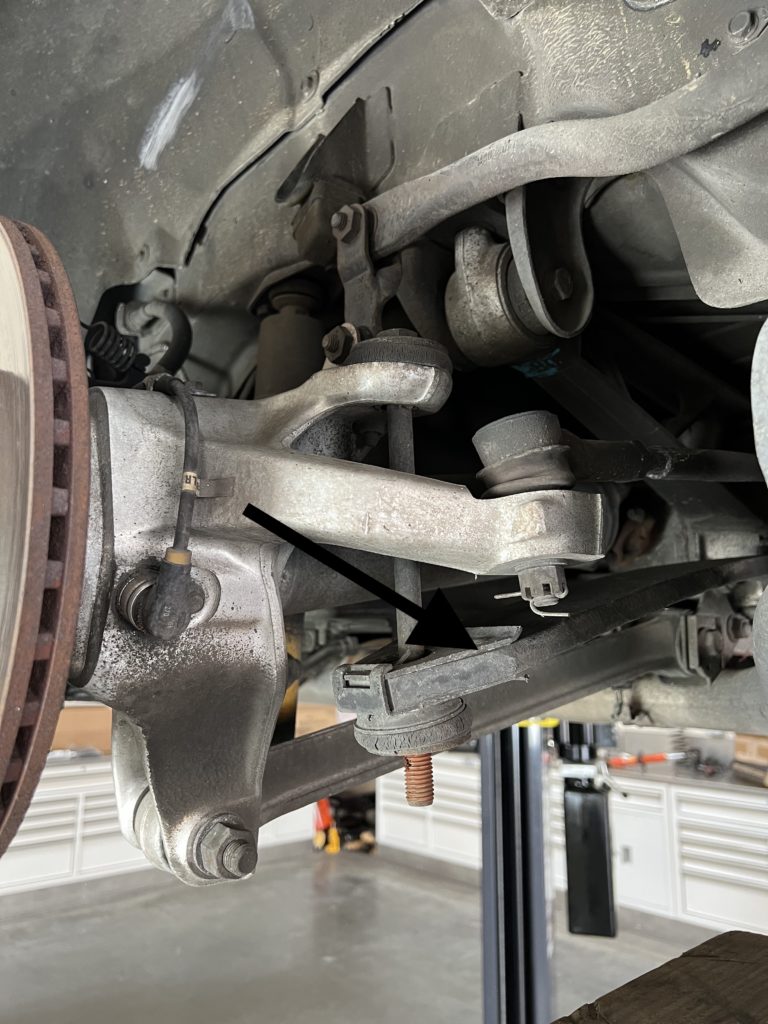
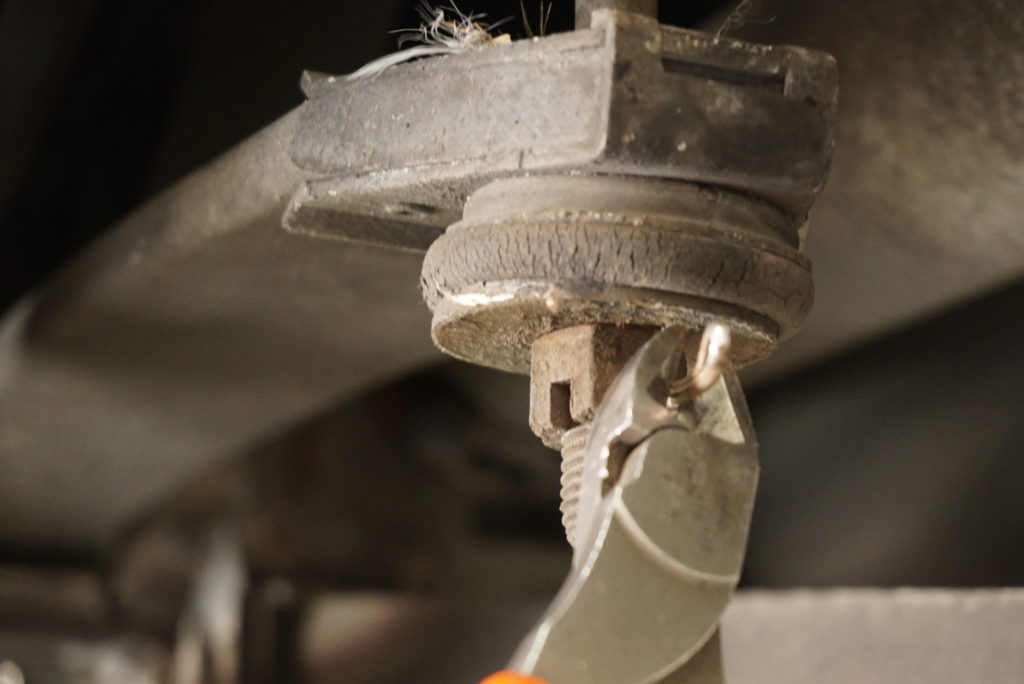
7) The leaf springs are held in with this nut and bushing system. Remove the cotter pin that holds the castle nut in place. Support the leaf spring with a jack and remove the retaining nut. Next, slowly release the pressure on the leaf spring.
8) The leaf springs drops out in this manner. Note that you need to remove all bracketing that attaches the spring to the car.

9) Remove the lower shock mounts, noting that the shock is under compression and could spring to full extension when released. After you release the lower bolt, press the stud that holds the lower end of the shock out of the mount and let it hang.
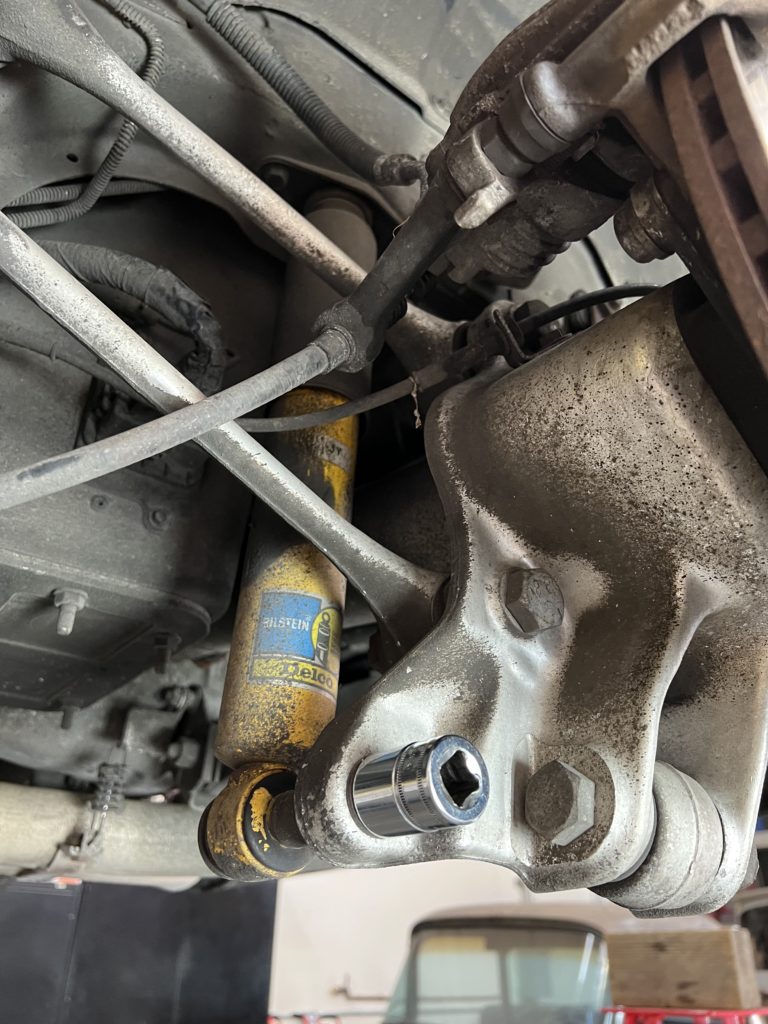
10) The top shock mount bracket uses two bolts to hold it in place. Release these bolts and the shock will come free.
11) After removing the two bolts that hold the upper shock mounts bracket, remove the original shock from the chassis. Note that the hardware that connects the shock to the chassis will be reused.
12) Release the nuts from the back of the bearing hub supports where they attach to the hub assembly. Do not remove the bolts completely, just take off the nuts and washers and leave the bolts in place.
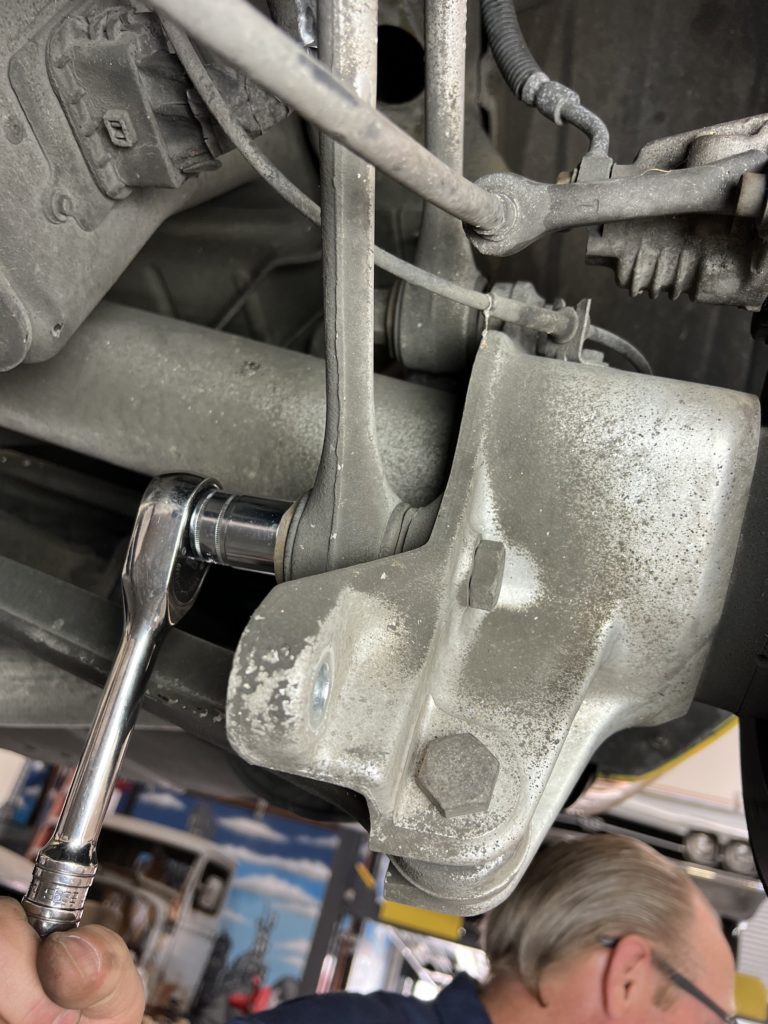
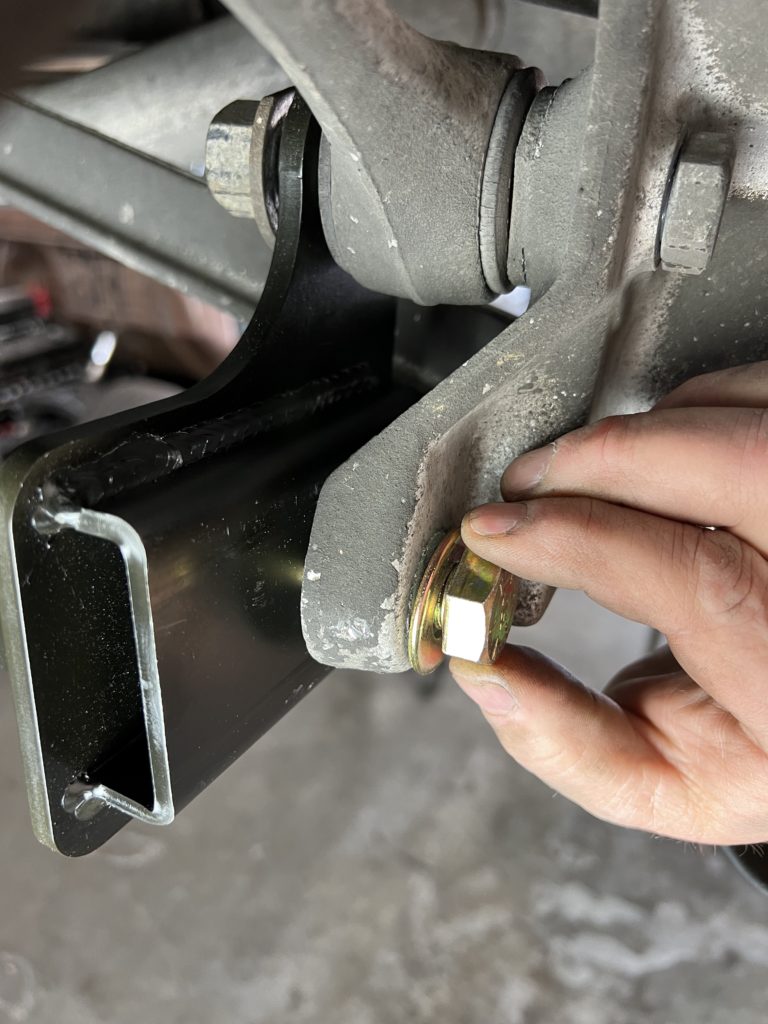
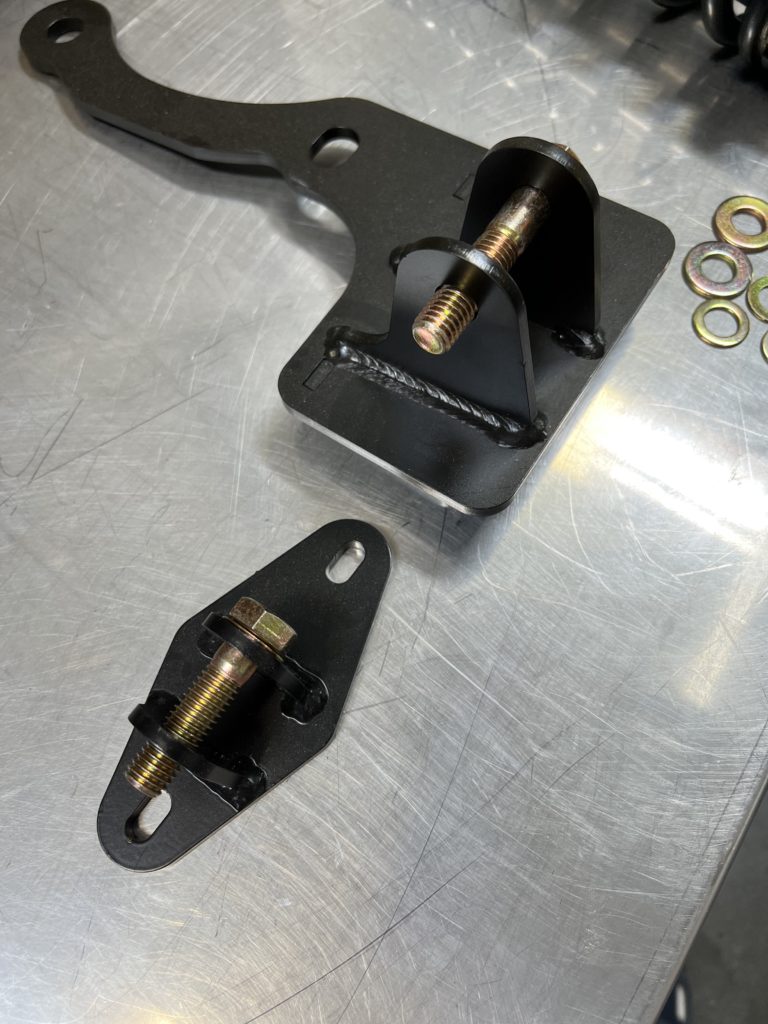
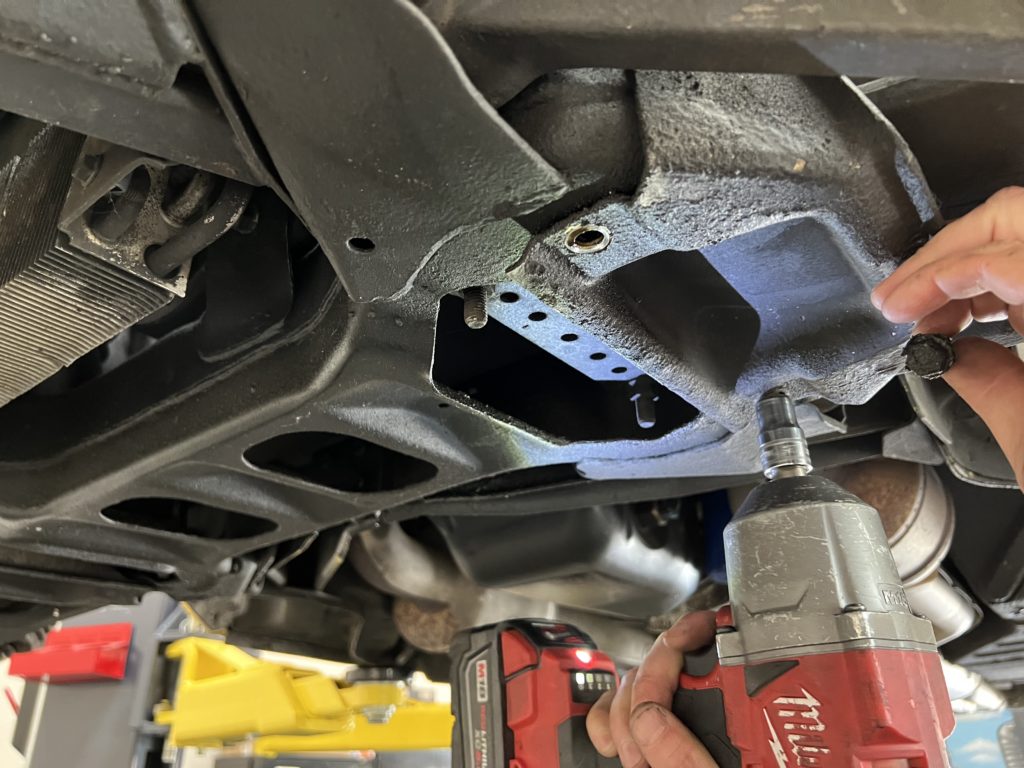
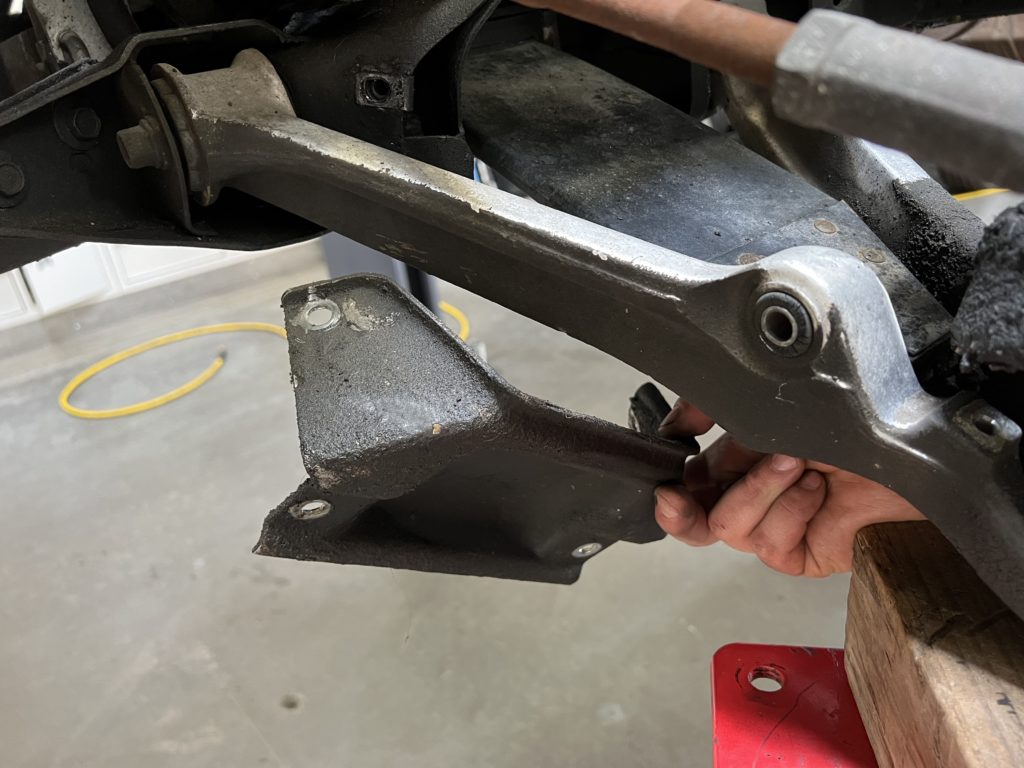
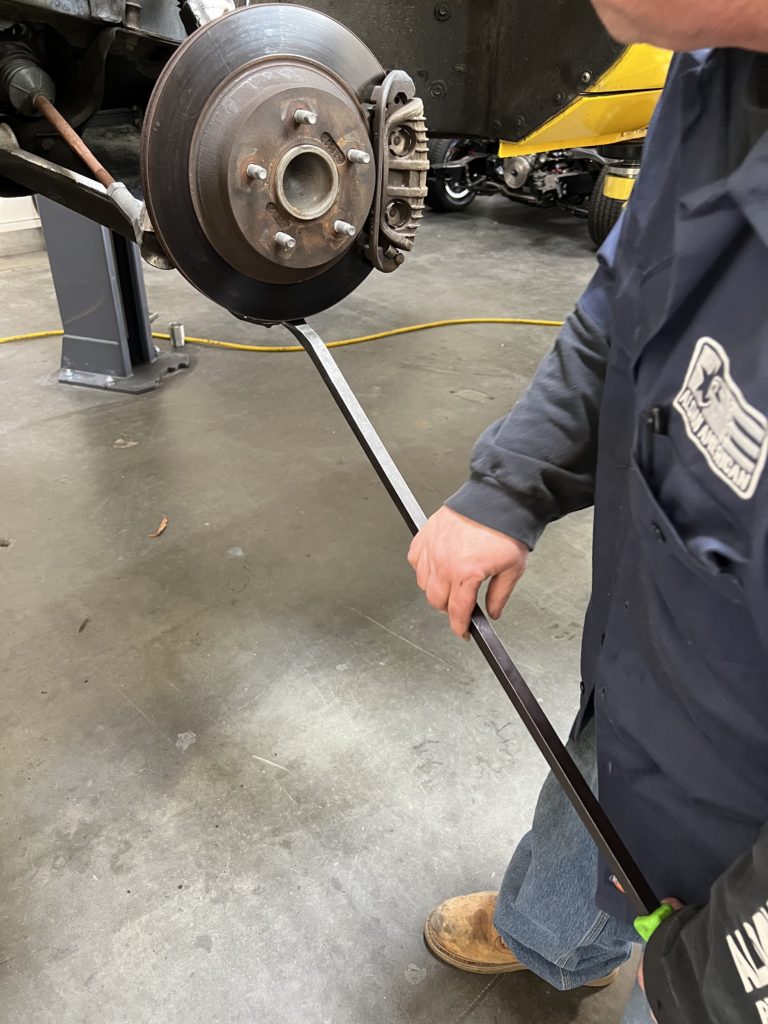
13) The Aldan American-supplied coil over shock mount brackets fit over the studs left by removal of the hardware in the last step. An additional bolt will be added to the lower section of bracket through the hole that was formerly used to mount up the lower end of the original shock.

14) To hold the Aldan American bracket in place, we reused the factory washers and nuts on the bearing/hub supports.
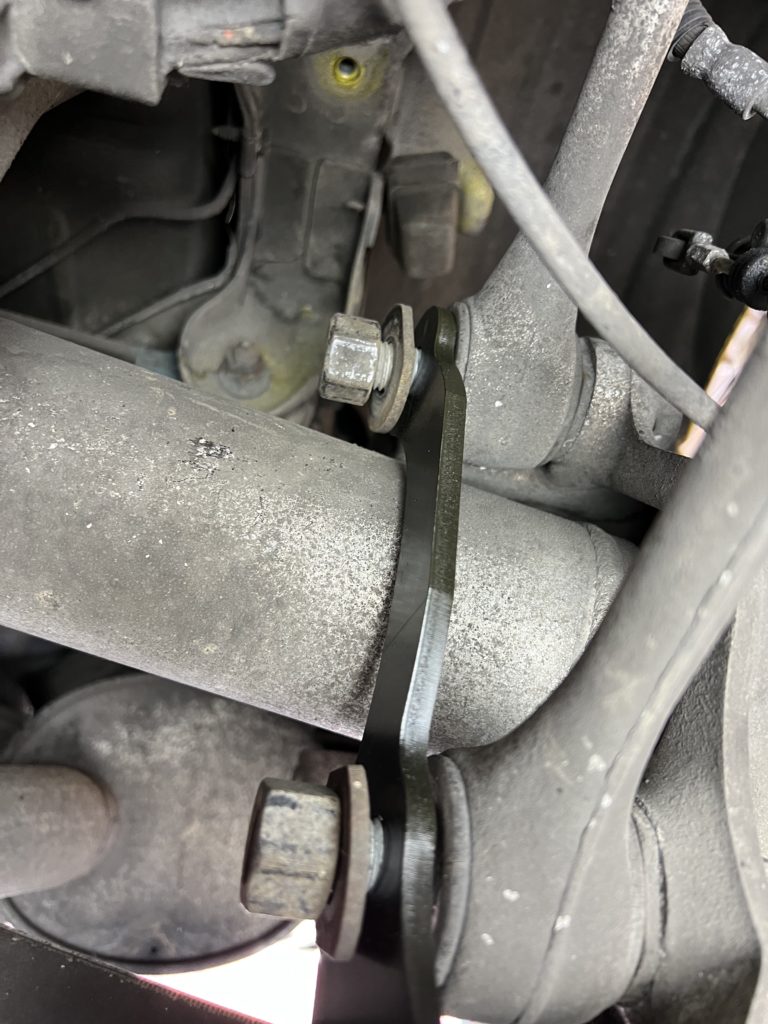
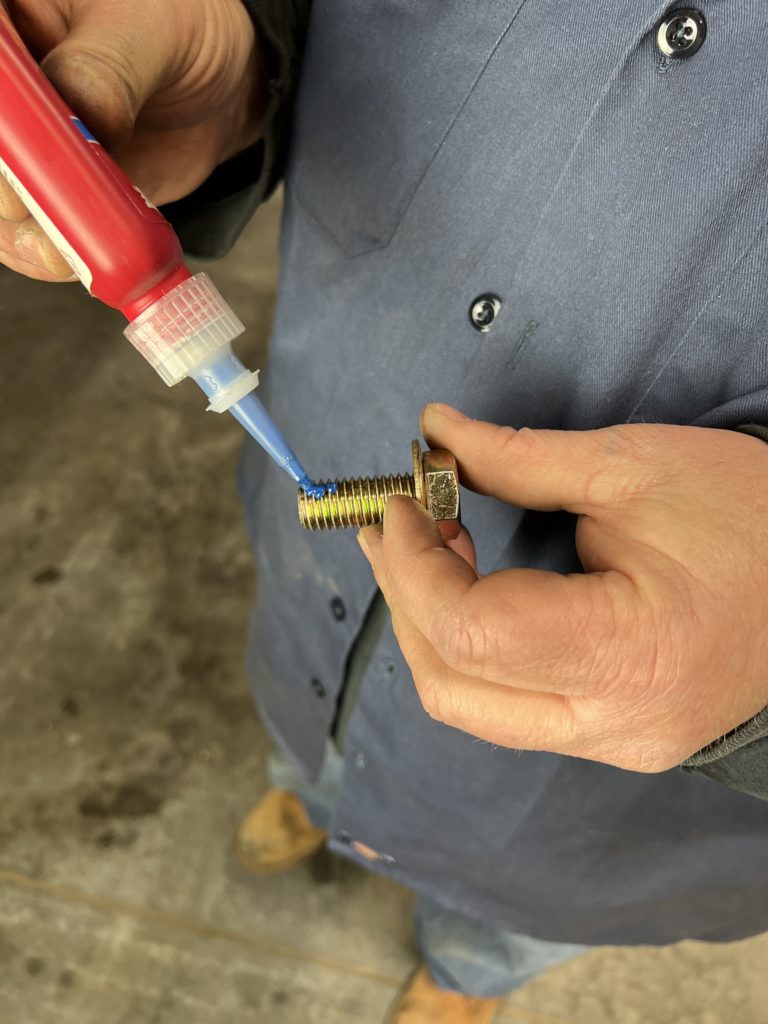
15) Use Loctite red thread locker on the Aldan American-supplied bolt that holds the bracket in place at the bottom.
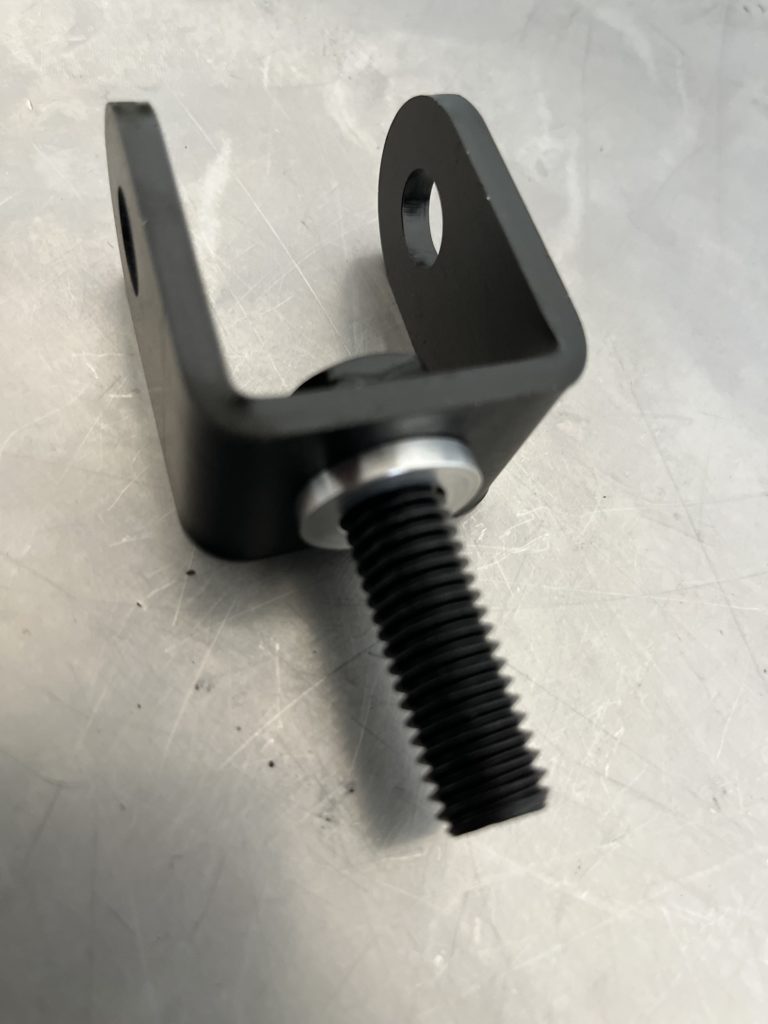
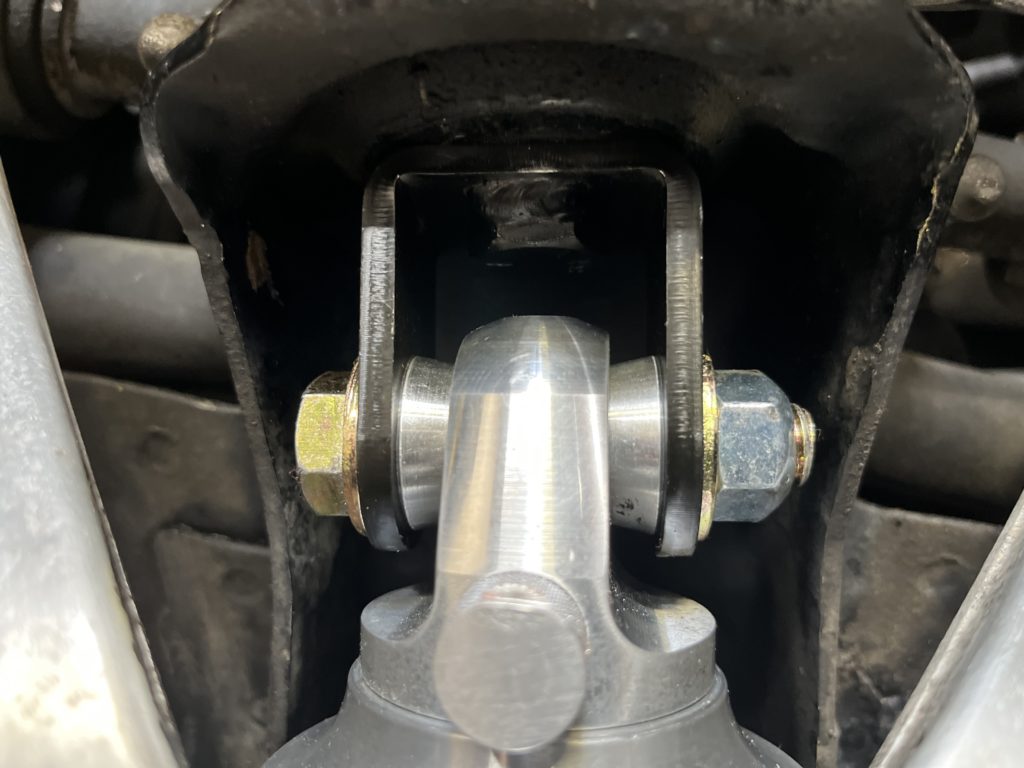
16) Keep the upper two mounting points loose (the two swing arm connections), until you have the bottom bolt threaded in place.
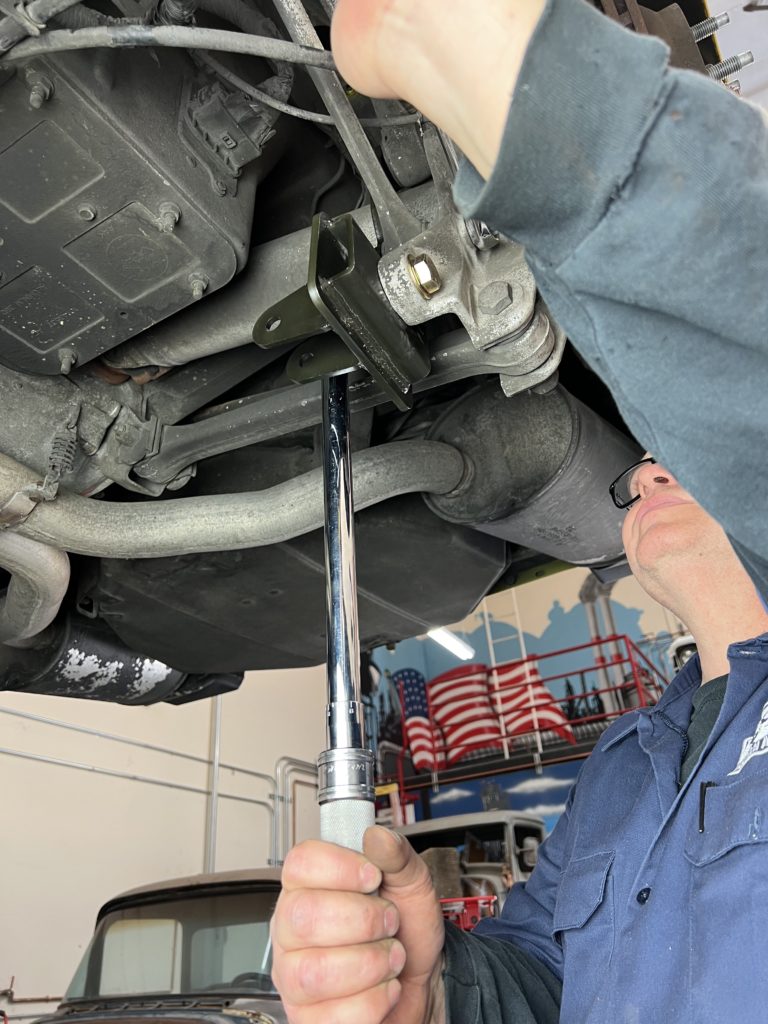
17) Torque the swing arm bolts and hub system bolt to 120 lb. ft. It is critical that this bracket not come loose recheck this torque spec at least once after initial tightening.
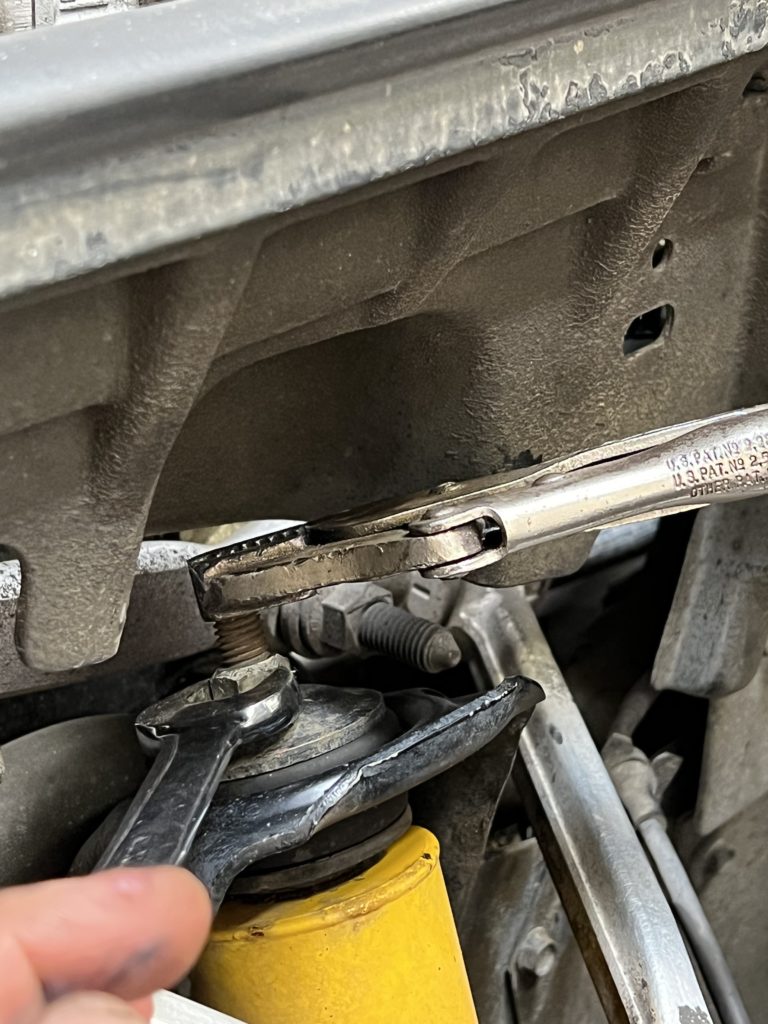
18) The upper shock mount (left) uses the smaller Aldan American bolt and the larger end uses the larger supplied bolt.
19) For starters we used turned the upper rebound knob counter clockwise until it stopped and then four clicks clockwise as an initial setting for street driving. The knob has 11 positions of adjustment.
20) The lower shock adjustment system allows for dialing in the compression settings for the shock. Similar to the upper adjustment, we turned the knob counter clockwise until it stopped and then only two clicks clockwise as an initial setting.
21) The upper shock mount can be installed in two ways (positioning the top of the shock more forward or more back), however due to suspension components that could have come in contact on this vehicle, we shift the bracket mount back moving the shock connection forward.
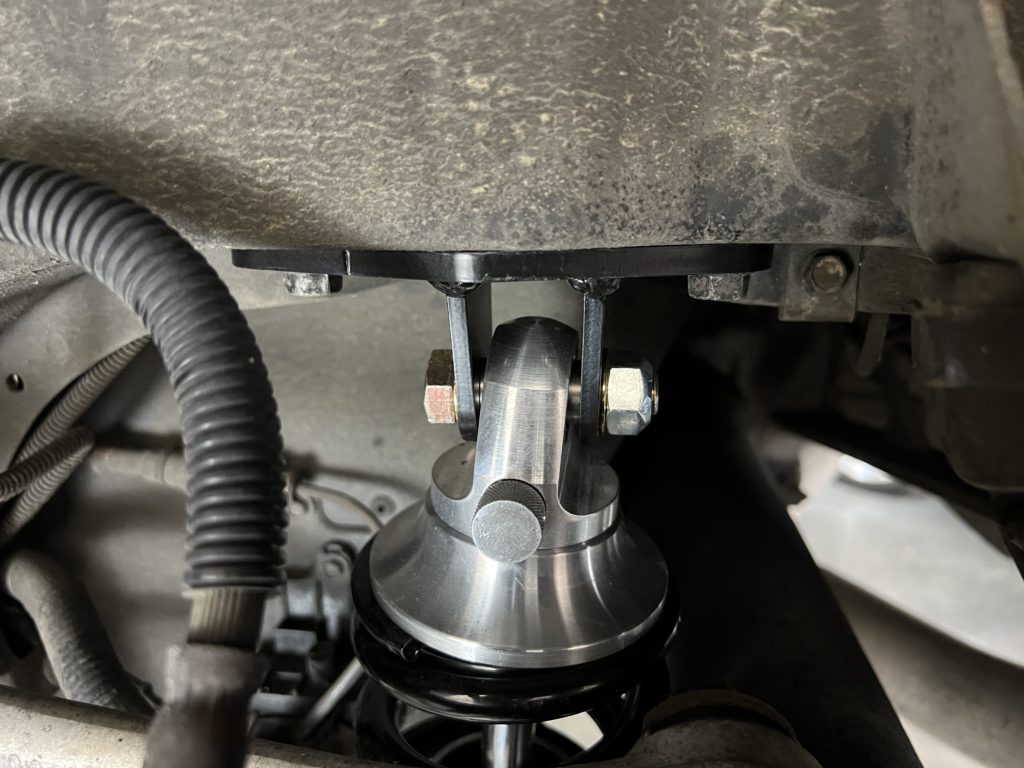
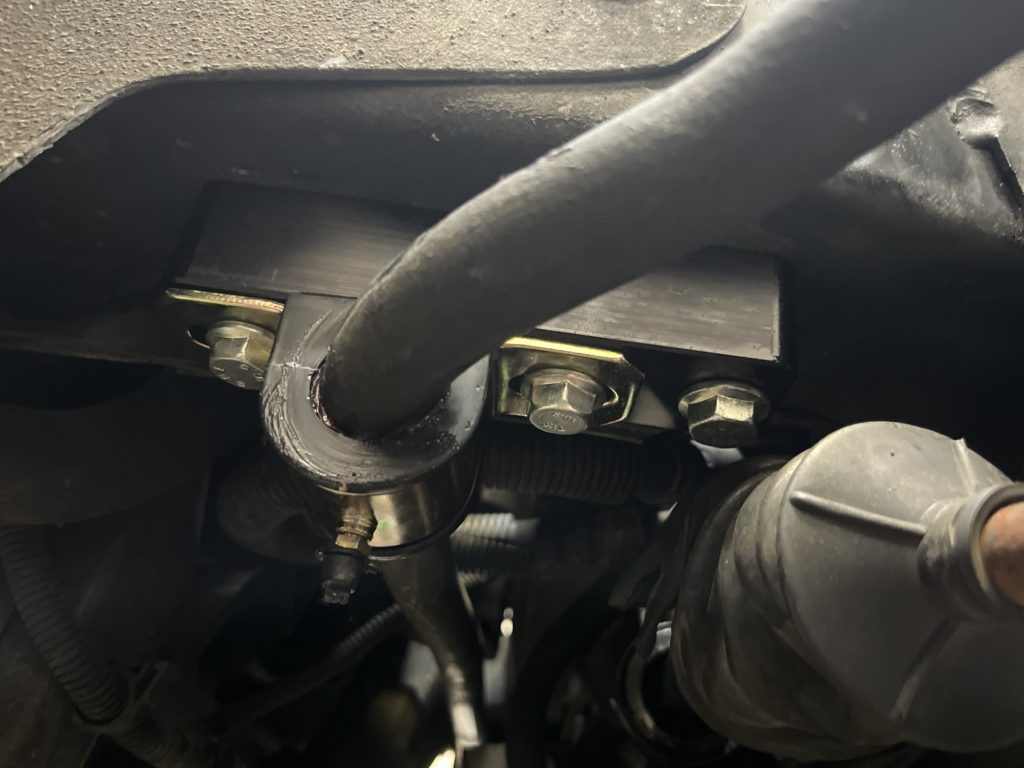
22) Note that the compression adjustment knob on the coil over shock is facing toward the front of the car for easy access and adjustment. The bottom shock bolt is a supplied item from Aldan American and required torquing to 55 lb. ft.
23) Moving to the front of the Corvette, the front anti-sway bar will need to be removed to access shock area and to remove the front leaf spring.
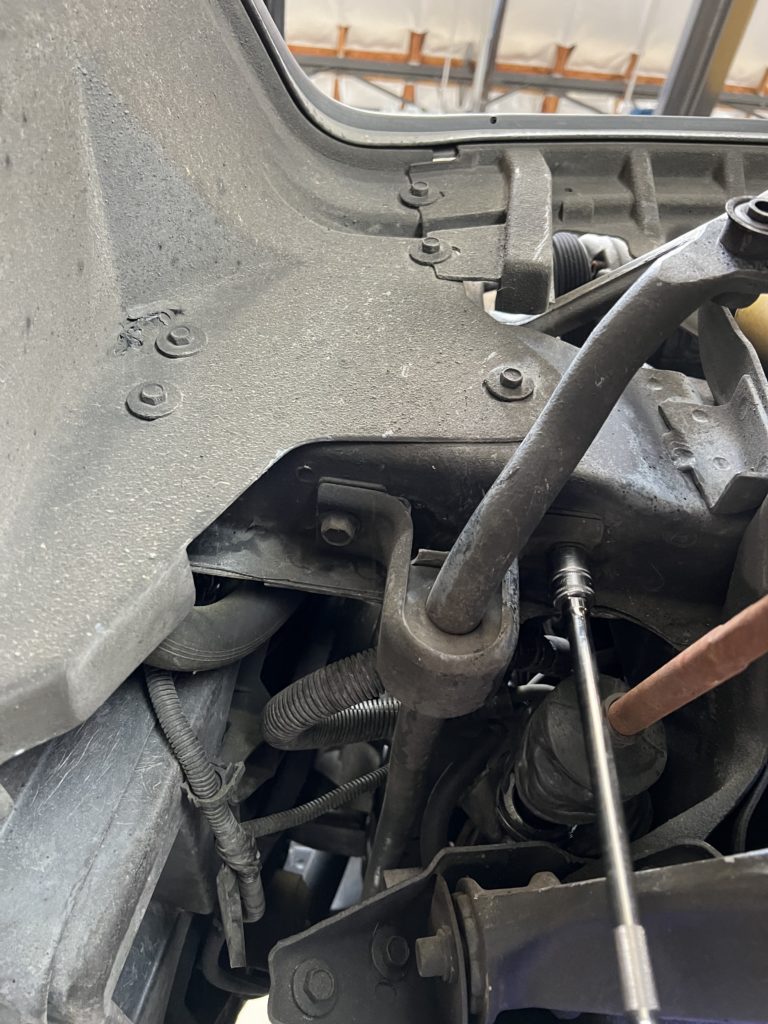
24) After removing the end links and the four bolts that hold the anti-sway bar to the frame, the bar should slip out and down from the chassis with little trouble.
25) A series of covers keep the factory leaf spring protected from road debris. There are four of these covers on our Corvette that must be removed, each with a series of bolts that attach it to the chassis.
26) The above noted covers look like this and fit around the leaf spring area. For this part, there are four bolts that hold this cover in place. None of these parts will be reused.
27) The top of the original shock features a stud that protrudes from the shock and a nut that holds it in place. The top of most traditional shocks is designed with a twin half-circle shape at the top of the stud. A special socket specifically for shock removal can be purchased that will hold the stud from turning when the containment nut is removed. If you don’t have that special socket, gripping the stud with a pair of vice grips can keep the stud from turning during nut removal. In most cases it is good to soak the threaded section and nut with penetrating oil to aid in removing the containment nut.
28) The lower ball joint must be released to allow removal of the transverse leaf spring. Here we backed off the nut that holds the ball joint together but left it attached to the ball joint stud.
29) Next, remove the two bolts that hold the bottom of the original shock to the lower A-arm.
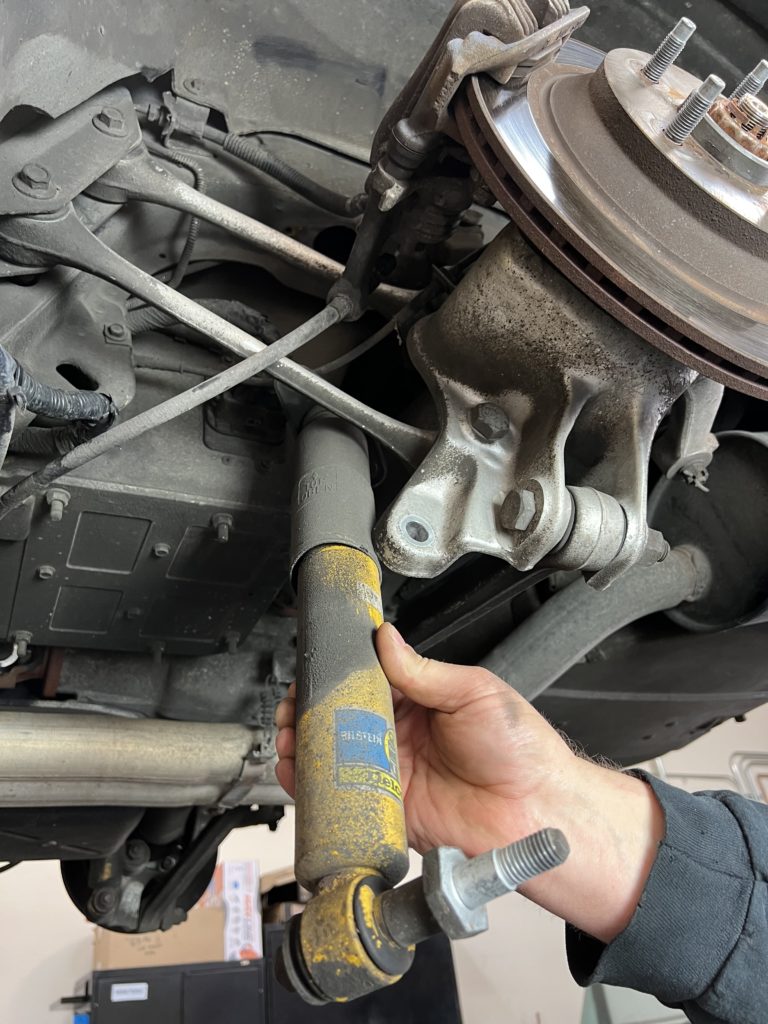
30) The shock drops out easily at this point. Note the condition of the shock after removal to check for any points where the shock was possibly coming in contact with other suspension components. While the paint on our shock was worn off in spots, the shock was in good shape and the chassis was a ready candidate for our coil over upgrade.
31) To allow access to the leaf spring, we popped the bottom ball joint away from the lower A-arm by simply adding some leverage to the A-arm with this pry bar. Never use a pickle fork to pop the ball joint away from the A-arm as it will render the ball joint unusable and it will have to be replaced. In our case, it took very little effort but as you can see, leverage was on our side.
32) A series of brackets hold the center section of the transverse leaf spring to the chassis. The bolts that keep these brackets in place are visible after the dust covers have been removed.

33) With the brackets out of the way, the leaf spring should be easily removed from the suspension. The leaf spring will not be used with the Aldan American coil over system. Remember to not over extend the flexible brake line. This is also a good time to inspect the brake system and lines for wear, damage and fluid leaks.
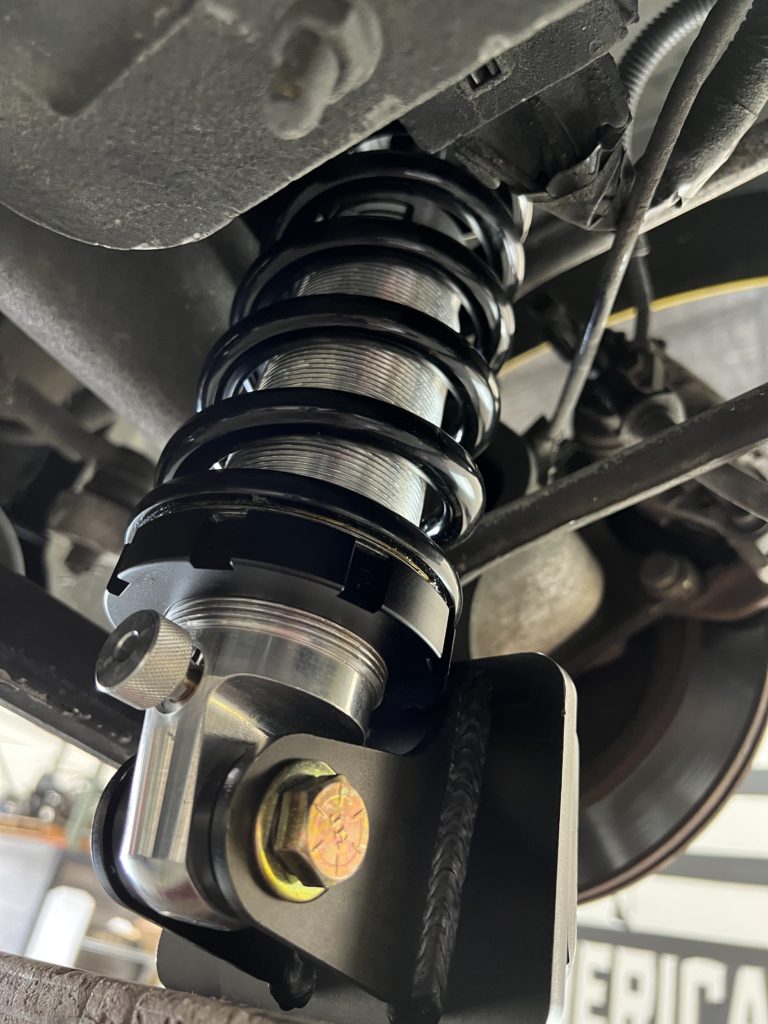
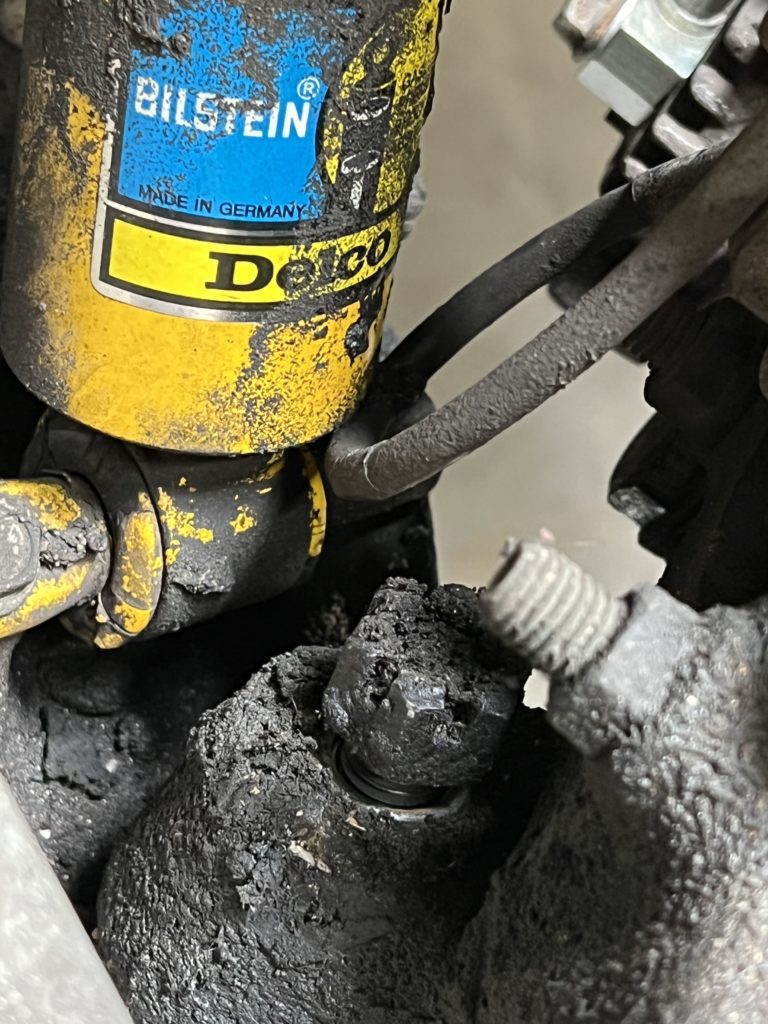
34) This specialty bracket is included with the C4 upgrade kit and positions the shock perfectly in the tower. The top cross bolt for the Aldan coil over shock should be torqued to 55 lb-ft. Use a lock nut on the upper stud that protrudes through the A-arm to avoid having it back off under use. You could also double nut the upper attachment point for insurance.
35) At this point, the Aldan American coil over shock should look like this and be ready for reattachment to the lower A-arm. The golden coloration on the shock body is anti-seize lubricant.

36) As was the case with the rear coil over, the top rebound adjustment is turned to zero by twisting in a counter clockwise direction until it stops then four clicks clockwise as a starting point. The beauty of this system is that adjustments are easy to complete when the shock is fully installed and can be tuned for on road driving or performance competition.
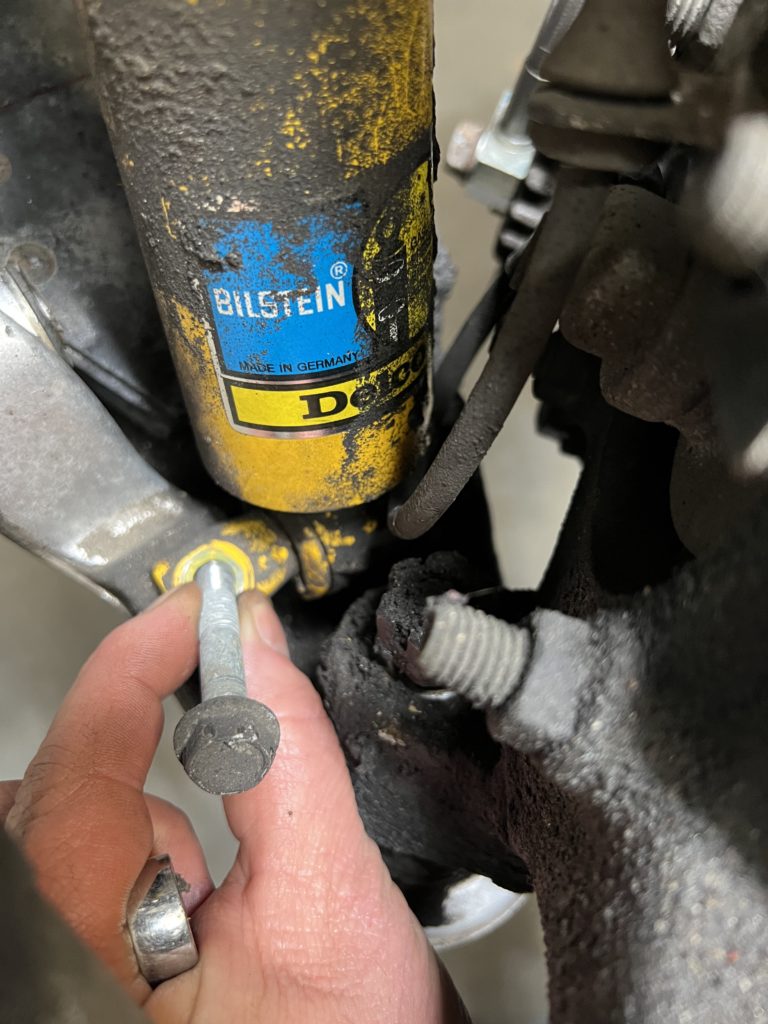
37) The bottom of the coil over mounts to the A-arm reusing the factory bolts. Note the location of the compression adjustment knob (arrow), which is turned counter clockwise until it stops then one click clockwise for a basic street performance setting. The ride height of the Corvette can be adjusted using by turning the black collar on the coil over to compress the spring and drop the ride height. Aldan American provides a wrench so you can perform this action with the car on the ground.

38) Next we reassembled the front ball joint tightening it to the factory spec. In our case, we used a transmission jack to compress the coil over shock for ease in reconnecting the lower ball joint. Always replace the cotter pin/key to keep the castle nut to keep it from backing off.
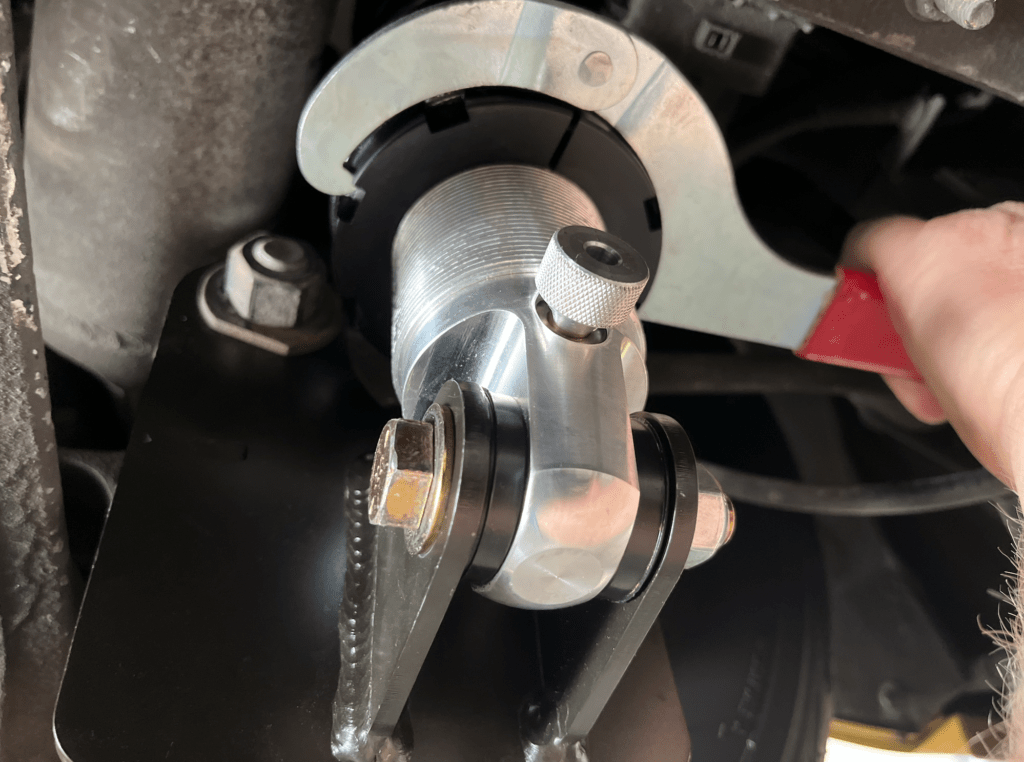
39) This Aldan American adjustment wrench allows for raising or lowering the body height while the tires and wheels are still in place. Changing the ride height does slightly change the coil spring rate and ride quality
40) The front anti-sway bar must be moved slightly forward in the chassis to clear other suspension parts within the Aldan American shock system. This relocation block helps make this a very simple alteration. The block fits in the stock anti-sway bar mounting holes and the original bar mounts in the new holes in the block. The original link hardware can still be used.*These block kits necessary to complete this kit install and are sold separately from our coilover kits. These sway bar relocation kits can be purchased online from various part retailers.
41) Final ride height is really at the preference of the owner. Lowering the roll center of the suspension by lowering the car will aid in the car’s cornering ability. For our purposes, we set the ride height at xxxx inches in the front and slightly higher at xxx inches in the rear. Note that with our Aldan American shock system we can set the height at exactly at the number desired both front to back and side to side.
42) In the rear we dropped the overall ride height 1.25-inches, the lower edge of the fender lip now set at 26.25-inches from the ground. Note that with our Aldan American shock systems, we can set the height at exactly at the desired height, both front to back and side to side.

43) The final look is significantly different from the original. The new Aldan American Coil overs and adjustments will improve cornering ability and deliver better road manners while allowing the owner to adjust shock dynamics though the simple turn of the rebound and compression knobs.

Source:
Aldan American
aldanamerican.com
310-834-7478